Using multiple windows layouts.
Activating/deactivating an app.
Tiling windows with the arranging keyboard.
Tiling windows with manual arrangement.
Keyboard shortcuts quick guide.
Snapshots creation and restoring.
What is Mosaico.
Mosaico is a desktop utility for Windows™. It remembers and restores the position and size of any window on the screen and allows you to tile windows so that they cover the entire screen surface. This makes it easy to switch, for example, from a “work” to a “file comparing” desktop layout quickly. It is also very useful when organizing windows on a multiple monitor setup, for example when connecting your laptop to a projector for a presentation. Mosaico also supports a lot of keyboard shortcuts that make it easy and fast to use.
Installation and activation.
To install Mosaico just double click on its installation file and follow onscreen instructions. When you run Mosaico for the first time an activation is required. Activation is free and doesn’t send any personal data outside of your computer. An internet connection must be active in order to connect to the activation server. Just press the “Try Mosaico for free!” button and wait for few seconds. Once activated, Mosaico will start automatically and will work for 14 days (trial period). To continue using Mosaico without time limits you can buy a license code at http://www.soulidstudio.com/buy/ and register it, as explained later in this manual.
Using multiple windows layouts.
Mosaico can remember the position of each running application on your desktop. It can save the layout of all the running applications in a “snapshot” and restore it later. So you can save up to 8 snapshots, and switch from one to another to quickly change your desktop layout. Snapshots are persistent, they are automatically saved to disk to be available after a computer reboot.
Using snapshots.
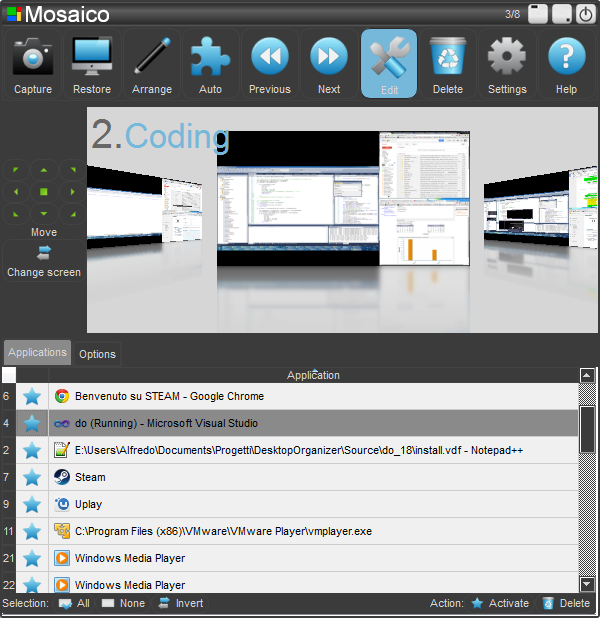
To capture a snapshot just press the “camera” button.
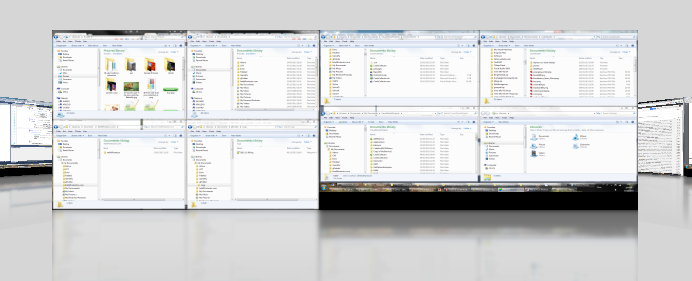
A snapshot miniature will be added to the picture-flow view. You can alternatively use the CTRL+ALT+SPACEBAR hotkey combination.
Each snapshot has a fixed position number, from 1 to 8. When you capture a snapshot it will be positioned in the current position if it is available, or in the first available position starting from 1.
You can browse snapshots by:
- pressing “previous snapshot” and “next snapshot” buttons
- scrolling the mouse wheel
- using keyboard arrow keys when Mosaico window is active
- clicking on the previous/next one in the pictureflow view
- using arrows as keyboard shortcuts: CTRL+ALT+...
- LEFT ARROW: browse previous snapshot
- RIGHT ARROW: browse next snapshot
- DOWN ARROW: stop browsing (Mosaico user interface will tabify if it was previously tabified)
- UP ARROW: restore current snapshot
You can restore the current snapshot using the “restore” button.
The desktop layout will be restored, each window will be resized and repositioned according to its size and position in the snapshot. If an application in the snapshot is not running it will be launched and repositioned automatically. If an application is running, but it’s not contained in the current snapshot, it will be minimized (you can change this behaviour in the options).
You can restore the current snapshot also by double-clicking on it, or by pressing ENTER, or by pressing CTRL+ALT+UP ARROW.
You can restore any snapshot by its number using CTRL+ALT+
To delete a snapshot press the “delete” button.
The number of used snapshots Vs. the maximum number of available snapshots is displayed on the upper right, near the close button (i.e. 5 / 8 means 5 snapshots used on 8 available in total).
Editing a snapshot.
You can edit a snapshot in order to make it better suit your needs.
To perform editing operations open the snapshot editing screen by pressing the “Edit” button (or press “E” key).
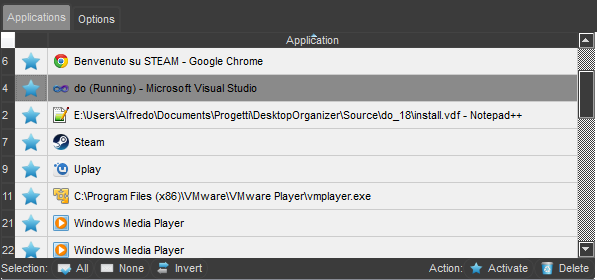
The list of apps stored in the selected snapshot will appear under the picture-flow window.
Each row of the table shows the window title of an app stored in the current snapshot. If the app has no window title, or it is not running yet, the path to the executable file will be displayed instead.
Activating/deactivating an app.
You can activate or deactivate an app inside a snapshot by pressing the “Star” button on the left of its name.
For example if you have your browser covering the whole screen with an explorer window underneath, you can decide to deactivate the latter, since it is not visible. Inactive apps are not resized/moved when restoring a snapshot, nor launched if they are not running yet. Not considering all apps makes restoring a snapshot much faster.
When you capture a snapshot, by default, only the apps that are visible on screen (i.e. not covered by other windows) are active. You can change this in the settings, making it possible to activate all the apps when a snapshot is captured.
You can fine tune a snapshot by deactivating the apps you don’t need immediately but may need in future, or deleting the apps you don’t need anymore.
Please note that activating/deactivating an app has no effect during arrangement operations.
TIP: deactivate all the apps you don’t need in a snapshot, this will make it much faster to restore.
Deleting an app.
To delete an app from a snapshot press the “Delete” button that appears near its name when hovering with the mouse cursor on it. A deleted app is removed permanently from the snapshot.
Editing an app.
To edit a single app press the “Pencil” button that appears near its name when hovering with the mouse on it. An app edit dialog will appear.
You can change the app’s executable file by typing its path in the “Executable” field, or by selecting an existing file using the “Browse” button.
You can change the arguments used when launching the app by typing them in the “Arguments” field. This is particularly useful for example when you want to launch a browser to a particular URL, or launch a software opening a certain file.
Apps selection.
You can select a single app by clicking on it. Its background color will change to dark grey. You can select multiple consecutive apps by holding SHIFT and left click, or non consecutive apps by holding CTRL and left click.
You can use the buttons at the bottom to perform an automatic selection of the apps:
- “All”: select all apps in the snapshot
- “None”: clears the selection
- “Invert”: makes selected apps unselected and vice versa.
You can activate selected apps altogether by clicking “Activate” or delete them by clicking “Delete”.
Snapshot options.
Select the “Options” tab to access the snapshot options panel.
In this panel you can type in a custom name for your snapshot. By default a snapshot is called after the timestamp it was captured at.
Here you can also modify snapshots position. Just drag the snapshot you want to move to its new position. The green screen represents the current snapshot. A blue screen represents another snapshot, while a white screen represents an empty position. Please note that you can change here every snapshot position, not just the current’s one.
Tiling windows.
To tile windows means to arrange windows side by side, so that they possibly cover the entire screen surface. Mosaico supports many predefined windows positions, called layouts. For example it is easy to make a window cover half screen, one third of screen, one sixth of screen and so on.
There are three main ways to tile windows using Mosaico:
- use the arranging keyboard (supports keyboard shortcuts)
- use the “arrange manually” button (arrange windows by dragging them)
- use automatic arrangement.
Tiling windows with the arranging keyboard.
Make the window you want to tile active by clicking on it. Then hover the mouse on Mosaico and click one of the arranging keyboard buttons.
You can “send” a window to a particular zone of the screen: left, right, up, down and so on. This action will tile the active window in the chosen direction. Note that pressing a direction button more than once will change the window’s size keeping its general position.
If you have a multi-screen setup you can send the active window to the next monitor by pressing the “next screen” button at the bottom. Active window’s new size and position will be proportional to the old ones, according to the new screen size. If you have identical screens resolutions then window’s size and position will be the same.
Mosaico offers a lot of predefined layouts and not all of them are active by default. You can customize which layouts you want to use for which button in the settings.
TIP: you can speed up windows tiling by using keyboard shortcuts. Press CTRL+ALT and a digit on the numerical keyboard to emulate Mosaico’s arranging keyboard (1: bottom-left, 2: bottom, 3: bottom-right and so on). You can set custom keys for this in the settings.
Tiling windows with manual arrangement.
To enable manual arrangement mode click on the manual arranging button.
The button will become enabled, changing its color to light blue.
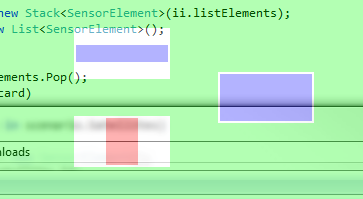
Now you can drag any window and release it wherever you want. It will be automatically tiled there. A translucent green overlay will show the possible next position of the dragged window. A set of screen miniatures is also displayed, showing the available layouts. Just point the mouse to one of these miniatures and release the window there to resize it accordingly. When a miniature is selected its color will change to red.
When manual arranging is enabled you can avoid tiling a window by pressing the right mouse button while dragging. This is handy if you don’t want to tile that particular window. The same effect is obtained by pressing the “Q” button on the keyboard. If you press “ESC” instead, the window is put back at its starting position.
To disable manual arranging just press again the manual arranging button.
You can change the layout miniatures displayed on screen in the settings. By default not all available layouts are shown, to avoid cluttering the screen.
TIP: when manual arranging is disabled, you can quickly enter this mode by pressing CTRL+ALT and dragging a window. When you release it, manual arranging mode will be automatically disabled.
Tiling windows automatically.
You can automatically tile all windows at once pressing the “arrange automatically” button.
An algorithm will calculate the portion of the screen to assign to each window based on your usage and it will arrange them in a dynamic layout. The entire screen should be covered by windows after this tiling operation. Note that minimized windows will remain minimized.
TIP: this feature is best suited for when you have few windows on screen (i.e. less than five windows).
Settings.
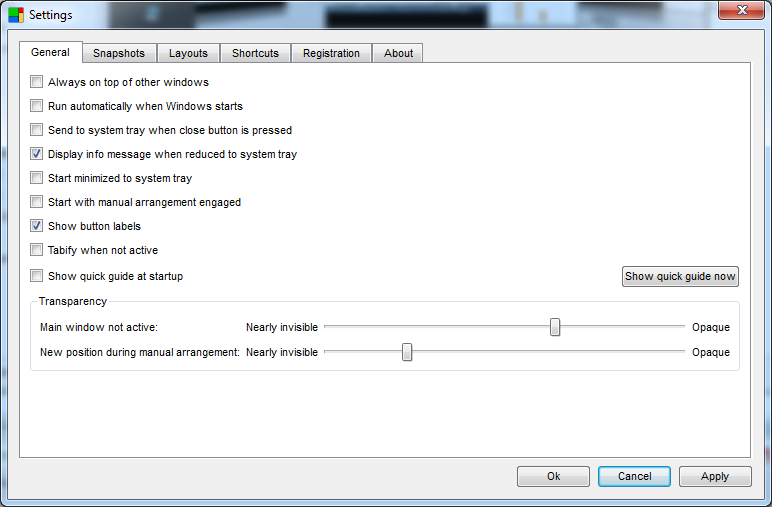
By pressing the “settings” button you can access a panel to customize Mosaico behaviour.
General tab.
- Always on top of other windows: Mosaico will be always on top of other windows, it will be translucent when not active. Snap it on screen edge to tabify it when not active.
- Run automatically when Windows starts: check this to automatically start Mosaico when Windows™ starts.
- Send to system tray when close button is pressed: when this is checked, pressing the “close” button will result in Mosaico minimizing to the system tray, instead of stop running.
- Display info message when reduced to system tray: when checked, an info message will be displayed every time you send Mosaico to the system tray.
- Start minimized to system tray: when checked Mosaico will go directly to the system tray when you launch it.
- Start with manual arrangement engaged: Mosaico will engage manual arrangement by default when it’s launched. You will be able to arrange windows by simply moving them. You can toggle manual arrangement off by pressing the “pencil” button.
- Show button labels: display button names in the main graphical interface.
- Tabify when not active: Mosaico will be reduced to a tab and anchored to a screen edge when it’s not the active window.
- Show quick guide at startup: if checked the quick guide will be shown every time you launch Mosaico. You can show the guide immediately by pressing “Show quick guide now”.
- Transparency: set levels of transparency for Mosaico itself when it is not active and for the manual arrangement overlay.
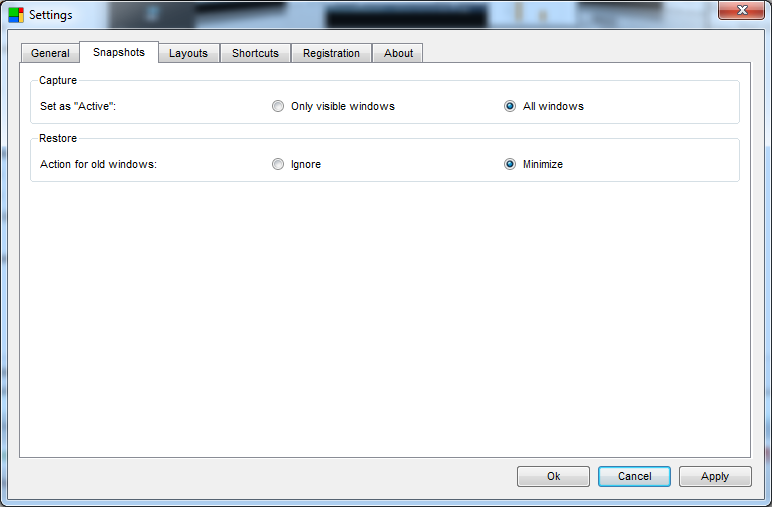
Snapshots tab.
You can customize the behaviour of Mosaico during the capturing and restoring of a snapshot.
- Set as “Active”: control which apps will be set as “active”: only the visible ones or all of them
- Action for old windows: old windows are the windows that are running when a snapshot is restored but are not part of the snapshot itself. You can decide to ignore them, leaving them in their current position and size, or you can minimize them.
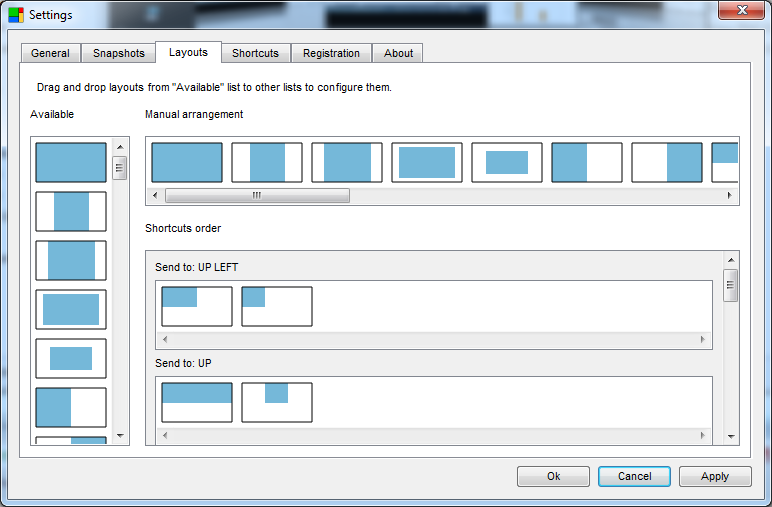
Layouts tab.
In this tab you can choose which layouts are to be used during arrangement operations.
The “Available” list contains all the layouts you can use. Light blue layouts are already used in manual arrangement, while grey layouts are not used.
To select which layouts to display in the overlay that appears during manual arrangement, drag and drop layout miniatures from “Available” list to “Manual arrangement” list. The layout in manual arrangement list will appear on screen during manual arrangement.
To assign a layout to a particular button in the arranging keyboard (and thus to numeric keyboard shortcuts ALT+CTRL+KEYPAD_1, ALT+CTRL+KEYPAD_2 etc.) drag and drop miniatures from “Available” list to the lists under “Shortcuts order” label. In these lists the order of the miniatures represents the order in which their layouts will be activated when pressing the button (or keyboard shortcut) multiple times. Note that you can assign to these lists even the layouts that are not part of the manual arrangement list (the grey ones).
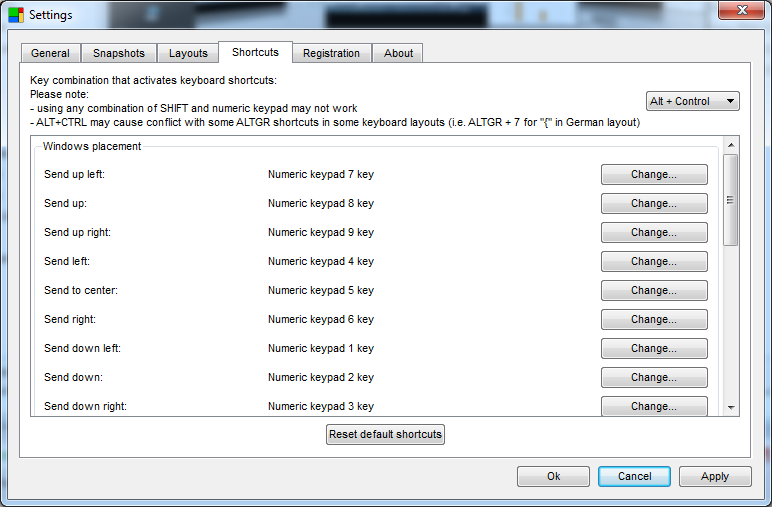
Shortcuts tab.
Here it is possible to re-define the keyboards shortcuts used for the arranging keyboard and the snapshot handling. Just press “Change...” button and then press the desired key on the keyboard.
You can reset the default shortcuts by pressing the “Reset default shortcuts” button.
You can change the key combination that activates keyboard shortcuts by choosing one of the available combinations in the list on the upper right part of this tab. Available combinations are:
- Alt + Control (default)
- Shift
- Control
- Alt
- Alt + Shift
- Alt + Control
Please bear in mind that any combination using the SHIFT button may not work when using numeric keypad buttons, since it triggers the alternative function for those keys. This depends on your Windows version and keyboard model.
Also please consider that using ALT+CTRL may affect other combinations of keys using the ALTGR button. For example ALTGR+7 for “{“ in the German keyboard layout. This is due to ALTGR button itself being mapped as ALT+CTRL in the hardware.
Registration tab.
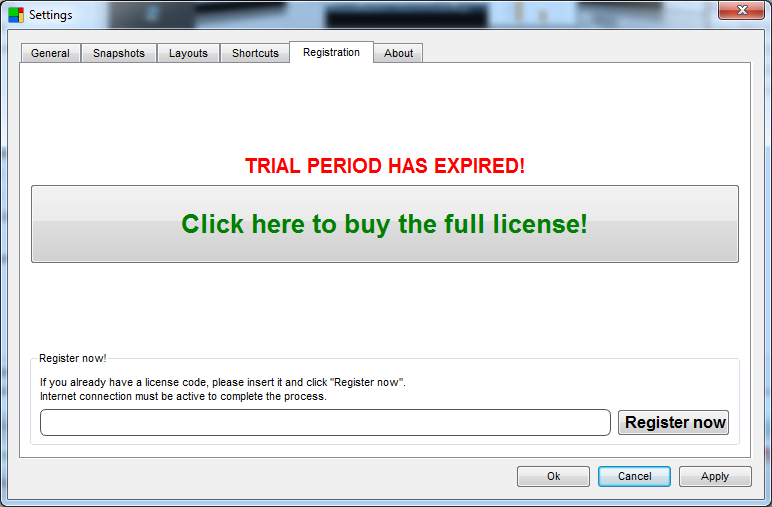
Here it is possible to register your copy of Mosaico. Just copy and paste your license code into the text field and press “Register now”. Once registered, this tab will show info about the license.
Registration.
Once Mosaico has activated you can try it for 14 days. If you like Mosaico and you want to continue using it after this period, you can buy a license on www.soulidstudio.com . In order to register your copy of Mosaico you can go to Settings/Registration tab. Here you can insert your license code and press “Register Now” button. An internet connection must be active to complete the process. Once registered, your copy of Mosaico will never expire and you can always update it to the latest version available.
Keyboard shortcuts quick guide.
Since the main purpose of Mosaico is to speed up your computer usage experience, a set of keyboard shortcuts is provided.
These shortcuts are activated by a key combination. This combination is CTRL+ALT by default and can be changed in the Shortcuts tab of the Settings screen. All the shortcuts can be changed there as well.
So, for example, to take a snapshot press CTRL+ALT+SPACEBAR at the same time, to restore snapshot number 3 press CTRL+ALT+3, and so on.
Here follows a quick list of shortcuts, it’s easy to learn them and it will greatly improve your speed with Mosaico.
Windows placement.
By default the numeric keypad is used to place windows around the screen and to move a window to the next available screen in case of multi-monitor setups. This commands apply to the current active window. You can obtain different window placements by pressing the same combination multiple times.
- Send up left: Numeric keypad 7
- Send up: Numeric keypad 8
- Send up right: Numeric keypad 9
- Send left: Numeric keypad 4
- Send to center: Numeric keypad 5
- Send right: Numeric keypad 6
- Send down left: Numeric keypad 1
- Send down: Numeric keypad 2
- Send down right: Numeric keypad 3
- Send to next screen: Numeric keypad 0
Snapshots creation and restoring.
You can quickly create and restore snapshots. Since there are eight snapshots available, you can restore them by pressing CTRL+ALT and the numbers from 1 to 8.
To create a snapshot press CTRL+ALT+SPACEBAR.
Snapshot browsing.
For quick snapshot browsing the keyboard arrows are used. When browsing in this way Mosaico window will appear on screen at its normal size even if it has been tabified or sent to tray before. It will disappear after few seconds after the last browsing command, or when you stop it with the dedicated shortcut.
- Browse to previous snapshot: LEFT ARROW
- Browse to next snapshot: RIGHT ARROW
- Stop browsing: DOWN ARROW
- Restore current snapshot: UP ARROW
Other features.
Tabbing.
You can snap Mosaico window to the screen edge. As soon as you activate another window, Mosaico will reduce its size to a tab. This is particularly useful when you keep it always on top of other windows for faster access. Mosaico will show its normal size window if you hover the mouse over it when it’s tabified.
You can fast tab Mosaico also by pressing the tabify button on the upper right part of its window.
Send to tray.
You can send Mosaico to the tray area by pressing the dedicated button in the upper right part of its window, near the quit button. When in the tray, you will be able to use the shortcuts normally.
To restore Mosaico normal window right click on its icon in the tray bar and select “Expand”. You can also send Mosaico to the tray by default instead of quitting it, by selecting “Send to system tray when close button is pressed” option in Settings/General tab.
Easy dragging.
You can drag Mosaico by left-clicking on any point in its window, not necessarily in the window title bar.
Online help.
To access the online help page (this page) you can press the “Online help” button.
Contact us.
If you find any errors in this manual or in Mosaico application, or have any question about Mosaico, please feel free to contact us. We will be happy to clarify any doubt and to consider any advice and/or feature request you would like to see implemented in future.
Please use:
- email: info@soulidstudio.com
- the contact form at www.soulidstudio.com/contacts/

